Ever wondered why your phyllo pastries never quite match those picture-perfect restaurant creations? The secret lies in understanding the delicate art of layering phyllo dough. How many layers of phyllo dough should I use? This question is key to achieving the perfect balance of crispiness and texture in your dishes. Is there a difference between filo and phyllo? Not at all – they’re the same delicate, paper-thin pastry that can transform your culinary adventures.
Phyllo dough is a versatile ingredient sold in the frozen aisle of most grocery stores. Professional chefs know that mastering its technique requires patience and precision. When you’re ready to create show-stopping dishes, the number of layers becomes key to achieving that signature flaky, crisp texture.
Typically, recipes recommend using 3-6 layers of phyllo dough, depending on your specific dish. Whether you’re crafting savory appetizers or decadent desserts, understanding how to handle this delicate pastry will elevate your cooking from good to extraordinary. From Greek spanakopita to classic apple turnovers, phyllo dough offers endless possibilities for creative home cooks.
Your journey into the world of phyllo begins with proper preparation. Thawing takes approximately 8 hours in the refrigerator, followed by an additional hour at room temperature to ensure the sheets are perfectly pliable. Each layer counts when creating that signature crisp, flaky texture that makes phyllo dishes so irresistible.
Understanding Phyllo Dough Basics
Phyllo dough is a culinary wonder that turns simple dishes into amazing ones. Its thin layers make food magical. When cooking halibut, knowing about phyllo is key, like whether to soak halibut first.

What Makes Phyllo Dough Different
Phyllo dough is special because of its:
- Extremely thin sheets that look like paper
- Needs careful handling to avoid tears
- Gets dry fast when exposed to air
Common Uses in Cooking
Phyllo is used in many dishes worldwide. It adds a crispy, flaky texture to both savory and sweet dishes.
| Cuisine Type | Popular Phyllo Dishes |
|---|---|
| Greek | Baklava, Spanakopita |
| Middle Eastern | Meat Pastries, Sweet Desserts |
| Balkans | Burek, Savory Filled Pastries |
Store-Bought vs Homemade Phyllo
You can buy or make phyllo dough. Store-bought is easy, while homemade is fresher. Both need special care for the best texture.
“The secret to great phyllo is patience and precision in handling.” – Professional Chef
Whether you buy or make phyllo, remember to handle it carefully. This is true for halibut and phyllo dough alike.
Proper Thawing Techniques for Phyllo Dough

Thawing phyllo dough needs patience and care. To avoid soggy phyllo shells, start with the right defrosting steps. It’s important to prevent moisture and keep the pastry sheets delicate.
“Rushing the thawing process can lead to broken, unusable phyllo sheets,” warns professional pastry chefs.
The best way to thaw phyllo dough is in the refrigerator. Here’s a simple guide for perfect results:
- Remove frozen phyllo from the freezer
- Keep the package sealed during thawing
- Place the package in the refrigerator
- Allow 8-24 hours for complete defrosting
To avoid soggy phyllo shells, remember these key tips:
- Never thaw phyllo at room temperature
- Use a damp kitchen towel when working with sheets
- Add a light coating of butter or oil between layers
- Work quickly once the dough is thawed
After thawing in the fridge, let the phyllo sit at room temperature for about 1 hour. This makes the sheets soft and pliable without getting too wet.
| Thawing Method | Time Required | Risk Level |
|---|---|---|
| Refrigerator Thawing | 8-24 hours | Low |
| Room Temperature Thawing | 1-2 hours | High |
Pro tip: Once thawed, phyllo dough cannot be refrozen without compromising its delicate structure.
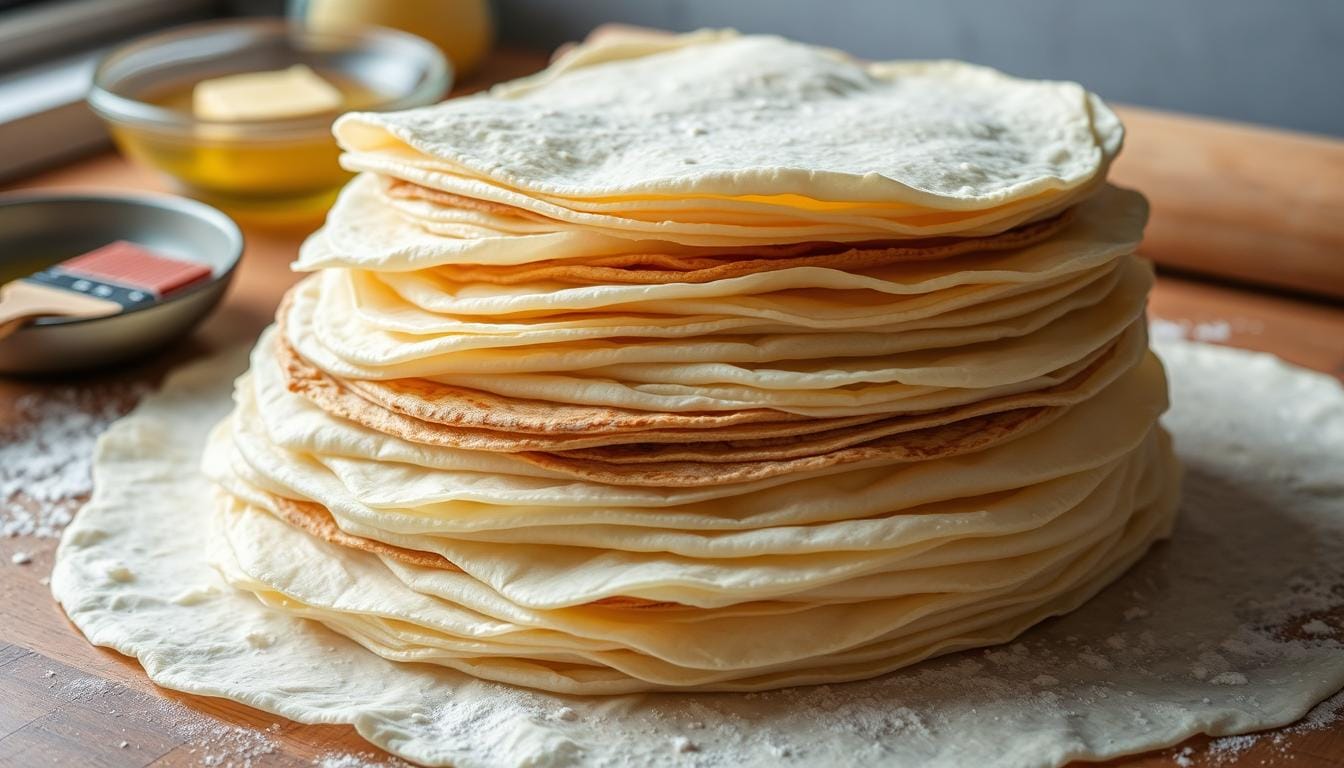
The Perfect Number of Layers for Different Dishes
Mastering phyllo dough means knowing how many layers to use for different dishes. The number of layers can change how your dish tastes and feels. Whether you’re using butter or olive oil, the right layer count is key.
Appetizers and Small Bites
For light appetizers, use 3-4 layers of phyllo dough. These dishes need a crispy, thin structure that complements the filling. Butter is best for these to add a golden, flaky touch.
- Recommended layers for mini pastries: 3-4 sheets
- Thickness preference: #4 (thinnest) phyllo for delicate bites
- Brush each layer with 1-2 tablespoons of melted butter
Main Course Wraps
For main dishes, you’ll need more layers. Use 6-8 layers to make sturdy, flaky wraps for big fillings. The goal is to balance crispiness with strength.
| Dish Type | Phyllo Layers | Recommended Thickness |
|---|---|---|
| Spanakopita | 4-6 bottom layers | #7 (medium) |
| Savory Pies | 6-8 total layers | #7 or #10 |
Dessert Preparations
Desserts like baklava are all about layering. They need 30-40 thin layers for a soft, delicious texture. For desserts, butter is often the better choice for its rich taste.
Pro tip: Keep phyllo dough covered with a damp cloth while working to prevent drying and cracking.
Working with phyllo dough takes practice. Each layer adds to the dish’s texture. So, take your time and enjoy the journey!
How Many Layers of Phyllo Dough Should I Use?
Working with phyllo dough is all about the layers. Yes, you must butter each layer for that flaky texture everyone adores.
Experts say to use 3-8 layers, depending on your dish. It’s all about knowing how to butter each layer for the perfect pastry.
“The secret to great phyllo is in the layers and the butter,” says renowned pastry chef Marie Laurent.
- For light appetizers: 3-4 layers
- For hearty main dishes: 5-6 layers
- For dense dessert pastries: 6-8 layers
Each layer needs a light brush of melted butter or olive oil. This helps the layers stick and creates that crisp texture.
| Dish Type | Recommended Layers | Butter Technique |
|---|---|---|
| Appetizers | 3-4 layers | Light brush between layers |
| Main Courses | 5-6 layers | Generous butter application |
| Desserts | 6-8 layers | Careful, even butter coverage |
Pro tip: Keep your phyllo dough covered with a damp towel. This keeps it moist and easy to work with.
Butter vs Olive Oil: Choosing Your Binding Agent
When making a halibut and spinach wrapped in filo recipe, picking the right binding agent is key. Your choice between butter and olive oil affects the taste and look of your phyllo pastry.
- Unsalted butter: Gives a rich, golden color and classic taste
- Extra-virgin olive oil: Offers a lighter, noutritious choice
Application Techniques
Here’s how to use your binding agent in your halibut and spinach wrapped in filo recipe:
- Use a soft pastry brush for even coverage
- Brush lightly to avoid tearing the phyllo
- Apply thin, consistent layers of binding agent
Amount Needed Between Layers
For binding agents between phyllo layers, use about 1/4 cup of vegetable oil mixed with 1/4 cup of water. This mix helps achieve a light, crispy texture and keeps the dough moist.
“The key is to be gentle and consistent when applying your binding agent.” – Professional Pastry Chef
Remember, spray-on olive oil is popular for its ease and quick prep. Whether you pick butter or olive oil, aim for a crispy and tasty phyllo dish.
Preventing Phyllo Dough from Drying Out
Keeping phyllo shells from getting soggy is all about handling them right and managing moisture. Phyllo dough is very delicate and can dry out fast if not covered. Chefs and home bakers know how important it is to protect these thin sheets for perfect pastries and appetizers.
To keep your phyllo shells from drying out, follow these key steps:
- Always cover unused phyllo sheets with a slightly damp kitchen towel
- Work quickly when preparing your recipe
- Remove only the sheets you need immediately
- Keep the remaining sheets tightly sealed
Here are some important tips on how to keep phyllo shells from getting soggy:
- Thaw phyllo dough slowly in the refrigerator (approximately 8 hours)
- Allow the dough to reach room temperature before use (about 1 hour)
- Use a light, damp cloth – not wet – to cover unused sheets
“The secret to perfect phyllo is speed and moisture control” – Professional Pastry Chef
Your technique is key to preventing phyllo from drying out. Brush each layer with melted butter or olive oil to keep it flexible and crispy. Remember, once exposed, phyllo sheets can become brittle fast, so be precise.
| Storage Method | Duration | Best Practices |
|---|---|---|
| Refrigerated (Unopened) | 4 weeks | Keep sealed in original packaging |
| Thawed at Room Temperature | 2-3 hours | Cover with plastic wrap and damp towel |
| Frozen Storage | 2 months | Wrap tightly in plastic and foil |
By using these techniques, you’ll learn how to keep phyllo shells moist and ready for your dishes.
Working with Phyllo for Savory Recipes
Phyllo dough is great for making tasty savory dishes. Its thin layers and crispy texture turn simple ingredients into gourmet meals. These dishes are loved by both home cooks and their guests.
Halibut and Seafood Preparations
When cooking halibut with phyllo, knowing how to prepare it is key. Should you soak halibut before cooking? It depends on the fish’s freshness and your recipe. Fresh halibut usually doesn’t need soaking, but drying it well prevents phyllo from getting soggy.
- Pat halibut dry with paper towels
- Season fish before wrapping in phyllo
- Use thin layers to maintain crisp texture
Vegetable Filling Techniques
Getting the vegetable filling right is all about managing moisture. Too much liquid can ruin your phyllo’s crispiness, making it soggy.
| Vegetable Type | Preparation Tip |
|---|---|
| Spinach | Thoroughly drain and squeeze out water |
| Zucchini | Salt and drain to remove excess moisture |
| Mushrooms | Sauté to reduce water content |
“The secret to perfect phyllo is managing moisture and handling the dough with care.” – Professional Chef
Working with phyllo for savory dishes takes practice. Each layer should be brushed with butter or olive oil. This ensures a golden, crispy finish that will wow everyone.
Creating Sweet Phyllo Pastries
Phyllo dough is a great choice for sweet pastries. It’s known for its flaky texture. You can start with apple turnovers to see its beauty.
To make sweet phyllo pastries, follow some important steps. These steps will help you create desserts that taste amazing:
- Select fresh phyllo sheets carefully
- Keep dough covered to prevent drying
- Brush each layer with melted butter
- Use gentle handling techniques
Apple turnovers are a great first try with phyllo. They need:
- 6 phyllo dough sheets
- Homemade apple pie filling
- Melted butter for layering
- Baking at 350°F for 13-15 minutes
“Phyllo dough transforms simple ingredients into extraordinary desserts” – Professional Pastry Chef
Working with phyllo for sweet treats takes practice. Each layer adds a special crispness. Try different fillings like berries or chocolate chips to find your favorite.
Common Mistakes to Avoid When Layering Phyllo
Working with phyllo dough can be tricky. But knowing common mistakes helps you make delicious pastries with confidence. Yes, you do need to butter each layer of phyllo. But there’s more to mastering this delicate ingredient.
Phyllo dough needs gentle handling and specific techniques for perfect results. Each sheet absorbs about one tablespoon of butter or oil. So, applying butter carefully is key.
Temperature Control Challenges
Temperature is very important in making phyllo. Here are some tips to keep in mind:
- Thaw phyllo slowly in the fridge for 8 hours or overnight
- Let it sit at room temperature for 1-2 hours before using
- Keep unused sheets covered with a damp cloth to prevent drying
Critical Handling Errors to Prevent
Avoid these common mistakes when working with phyllo:
- Rough handling: Phyllo is delicate and can tear easily
- Skipping butter between layers
- Leaving dough uncovered while working
“A few small tears are acceptable when layering phyllo – don’t panic!” – Professional Bakers’ Tip
| Mistake | Solution |
|---|---|
| Dry Dough | Cover with damp towel |
| Inconsistent Layers | Brush each layer with butter |
| Uneven Baking | Ensure uniform layer thickness |
Remember, do you have to butter each layer of phyllo? Yes! Buttering is what makes phyllo pastries crispy and flaky.
Storage and Makeup Ahead Tips
Storing phyllo dough and dishes right is key to avoid sogginess. Wondering how to keep phyllo shells crisp? It’s all about the right storage and prep methods.
Unbaked phyllo pastries can stay in the fridge for hours before baking. Getting the prep right is essential for that crisp texture.
- Cover unbaked pastries tightly with plastic wrap
- Store in the refrigerator for up to 2 days maximum
- Avoid exposing phyllo to excess moisture
“The secret to perfect phyllo is in its delicate handling and storage” – Pastry Chef Marcus Reynolds
For dishes made ahead, use these smart storage tips:
| Storage Method | Duration | Recommended Action |
|---|---|---|
| Refrigerated Unbaked | Up to 2 days | Cover with plastic wrap, keep sealed |
| Baked Phyllo Dishes | Same day | Consume within 6-8 hours for best quality |
To keep your phyllo crisp and tasty, work fast. Use a damp towel to cover unused sheets. Brush with melted butter or olive oil to shield against moisture.
Troubleshooting Phyllo Problems
Working with phyllo dough can be tricky. It’s a big decision whether to use butter or olive oil. Each option changes how your pastry turns out.
Moisture and how you handle the dough are common issues. Your choice between butter and olive oil depends on your recipe and what you want to achieve.
- Prevent tearing by keeping phyllo sheets covered with a damp towel
- Work quickly and gently when handling delicate layers
- Dust sheets with cornstarch to reduce sticking
Here’s how to reheat leftover phyllo dishes like a pro:
- Preheat oven to 300°F
- Place pastry on a baking sheet
- Warm for 10-15 minutes
- Check for crispy texture before serving
“Patience and technique are key to perfect phyllo preparation.” – Professional Pastry Chef
If your top layers come off too easily or the bottom feels doughy, try changing how you layer. Some bakers suggest using just 5 layers on top and bottom for better texture.
| Problem | Solution |
|---|---|
| Dry Phyllo | Cover with damp towel |
| Uneven Browning | Rotate pan midway through baking |
| Sticking Layers | Use cornstarch dusting |
Getting good at phyllo dough takes time. Every mistake is a chance to get better and make even tastier pastries.
Conclusion
Phyllo dough opens a world of culinary creativity. It goes beyond traditional recipes. Whether you’re making a halibut and spinach wrapped in filo recipe or trying out delicate desserts, knowing how to layer and prepare is key.
Your adventures with phyllo dough can be both savory and sweet. A halibut and spinach wrapped in filo recipe shows its versatility. Classic desserts like phyllo apple turnovers with vanilla ice cream show its adaptability. Remember, practice and patience are essential to mastering this delicate art.
The techniques you’ve learned will help you create stunning dishes with confidence. You now know how to thaw properly and choose the right number of layers. This empowers you to explore new culinary creations. Embrace the challenge, try different fillings, and let your creativity shine through each delicate, crispy layer of phyllo dough.
As you continue your culinary journey, don’t be afraid to push boundaries and develop your unique approach to working with phyllo. Each dish is a chance to refine your skills and create memorable dining experiences. These will delight your family and friends.
FAQ
Q: Is there a difference between filo and phyllo?
A: No, there’s no difference. Filo and phyllo are just two ways to spell the same thin pastry dough. They’re used in Mediterranean and Middle Eastern cooking.
Q: How many layers of phyllo dough should I use?
A: The layers depend on your recipe. For appetizers, use 3-4 layers. For main courses, 6-8 layers are best. Desserts like baklava might need 30-40 layers. Always butter or oil each layer for crispiness.
Q: Should you soak halibut before cooking?
A: Fresh halibut usually doesn’t need soaking. But frozen halibut might benefit from a 10-15 minute cold milk soak. This can remove fishy tastes and improve texture before wrapping in phyllo.
Q: How do you keep phyllo shells from getting soggy?
A: To avoid soggy phyllo, follow these tips:
– Work fast when preparing the dough
– Cover unused sheets with a damp towel
– Brush each layer with melted butter or olive oil
– Use dry fillings
– Bake at high temperatures for crispiness
Q: Is it better to use butter or olive oil for phyllo dough?
A: Both butter and olive oil have their benefits. Butter adds a rich flavor and flakiness. Olive oil is lighter and noutritious. Choose based on your recipe and taste.
Q: Do you have to butter each layer of phyllo?
A: Yes, buttering or oiling each layer is recommended. It ensures:
– Proper layer separation
– Crispy texture
– Enhanced flavor
– Prevents sticking
Q: Can I prepare a halibut and spinach wrapped in filo recipe ahead of time?
A: You can prep the dish ahead, but not too far. Assemble the phyllo wrap and refrigerate it for a few hours. Bake just before serving to keep it crispy.
Q: How do I thaw frozen phyllo dough correctly?
A: Thaw frozen phyllo slowly in the fridge overnight. Once thawed, keep it covered with a damp towel. Never microwave or rush thawing, as it can tear the sheets.