Ever wondered why your homemade phyllo pastry isn’t as crispy as you’d like? Is it better to use butter or olive oil for phyllo dough? The answer lies in the fat you choose. Butter offers rich flavor, while olive oil gives a lighter touch, and both can impact texture and crispness. Phyllo dough requires careful layering with butter or olive oil to create its signature flaky texture. Whether you opt for butter’s indulgence or olive oil’s subtlety, your choice affects not just the taste but the perfection of every layer. Let’s explore which option works best for your recipe!
Understanding Phyllo Dough Basics
Phyllo dough is a treasure from Mediterranean cuisine, used in both sweet and savory dishes. Many wonder if filo and phyllo are different. The truth is, they are the same thing! This pastry is known for its thin sheets that make layers of crispiness when done right.

What Makes Phyllo Dough Special
Phyllo dough is special for several reasons:
- Extremely thin sheets (almost translucent)
- Versatile for multiple cuisines
- Creates a crispy, flaky texture when layered
- Low-fat alternative to traditional pastry
Common Uses in Baking
Phyllo dough is used in many dishes across different cuisines. Some popular recipes include:
- Baklava (traditional sweet pastry)
- Spanakopita (Greek spinach pie)
- Cheese pastries
- Vegetable strudels
Store-bought vs Homemade Phyllo
Making homemade phyllo is challenging, but store-bought is convenient. Pastry chefs recommend frozen phyllo for home cooking. Making it from scratch takes up to 6 hours of rolling and preparation.
“Phyllo dough is an art form that transforms simple ingredients into extraordinary culinary experiences.” – Professional Pastry Chef
Whether you’re new to baking or experienced, phyllo dough can make your dishes special with its crispy layers.
Proper Defrosting Techniques for Phyllo Dough
Defrosting phyllo dough needs patience and care. Professional bakers say rushing it can mess up the pastry’s texture. Unlike halibut, phyllo dough needs a different thawing method.

To thaw phyllo dough right, use a slow and controlled thaw. Phyllo sheets come in 1-2 pound packages, sealed to keep them fresh. Here’s how to thaw them:
- Take the sealed package out of the freezer
- Put it in the fridge
- Let it thaw in the fridge for 8 hours
- Then, let it sit at room temperature for 1 hour
“Patience is the secret ingredient in working with phyllo dough” – Professional Pastry Chef
Here are common thawing mistakes to avoid:
- Never thaw phyllo in the microwave
- Don’t let it get direct heat
- Keep it covered to stop it from drying out
| Defrosting Method | Recommended Time | Success Rate |
|---|---|---|
| Refrigerator Thawing | 8 hours | 95% |
| Room Temperature Rest | 1 hour | 90% |
| Microwave/Direct Heat | Not Recommended | 5% |
Pro tip: Once thawed, phyllo dough can’t be frozen again. Only thaw what you’ll use in your recipe.
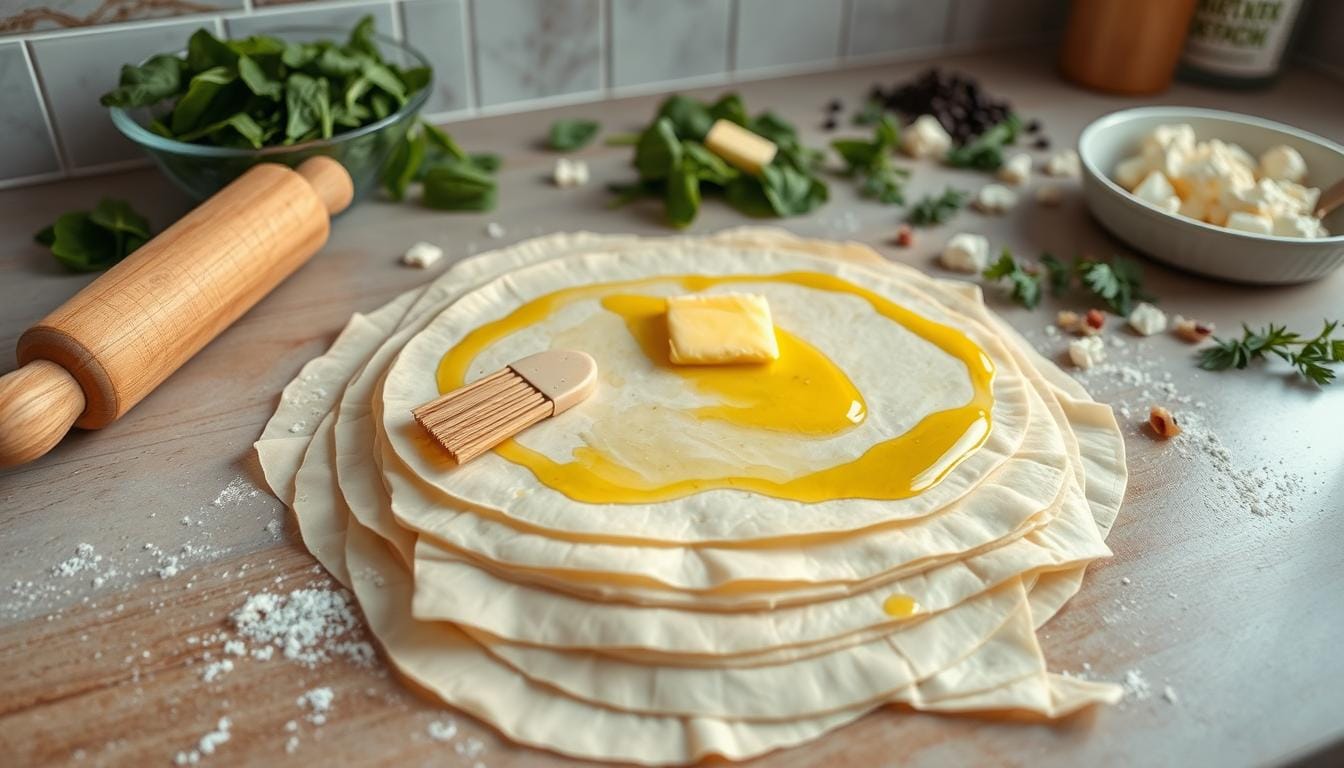
Is it better to use butter or olive oil for phyllo dough?
Choosing the right fat for your phyllo dough is key to great baking. Both butter and olive oil have special qualities that can make your dishes better. They help keep phyllo shells from getting soggy.
Understanding fats in phyllo dough is important. We’ll look at the main differences between butter and olive oil. This will help you pick the best fat for your recipe.
Benefits of Using Butter
- Provides a rich, golden color to your pastry
- Creates a luxurious, flaky texture
- Adds depth of flavor to traditional recipes
- Helps achieve a crisp, light exterior
Advantages of Olive Oil
- Serves as an excellent dairy-free alternative
- Offers a lighter, more delicate flavor profile
- Works well with Mediterranean-style dishes
- Helps prevent phyllo shells from becoming soggy when applied correctly
When to Choose Each Option
Your choice depends on the dish and what you want. To avoid soggy phyllo shells, follow these tips:
- Brush layers lightly with fat, avoiding oversaturation
- Allow each layer to dry slightly between applications
- Use a pastry brush for even distribution
“The secret to perfect phyllo is patience and a light touch with your chosen fat.”
Butter is great for classic pastries like baklava. Olive oil is better for lighter, Mediterranean dishes. The important thing is to use the fat sparingly and evenly. This keeps the texture crisp.
Essential Tools for Working with Phyllo
Creating perfect phyllo dishes needs specific tools. These tools help you handle this delicate pastry with precision. Knowing whether to butter each layer depends on the right equipment and technique.
When working with phyllo, your toolkit should include several key items. These items ensure your success:
- Soft bristle pastry brush
- Large baking sheet
- Clean kitchen towel
- Sharp kitchen scissors
- Plastic wrap
A soft bristle pastry brush is key when deciding if to butter each layer of phyllo. This tool lets you gently apply butter or olive oil. It does so without tearing the delicate sheets.
| Tool | Purpose | Recommended Type |
|---|---|---|
| Pastry Brush | Applying butter/oil between layers | Soft natural bristles |
| Baking Sheet | Supporting phyllo during preparation | Large, flat, rimmed sheet |
| Kitchen Towel | Covering phyllo to prevent drying | Slightly damp, clean cotton |
Pro tip: When working with phyllo, keep a damp cloth nearby. This prevents the sheets from drying out and becoming brittle.
“The right tools make phyllo preparation elegant and effortless.”
Remember, each layer doesn’t always need butter. But, strategic layering with minimal oil can create a crispy, delightful pastry. Practice and patience will help you master phyllo techniques.
Preparing Your Workspace for Phyllo Success
Creating the perfect environment for working with phyllo dough is key for your halibut and spinach wrapped in filo recipe. The right workspace can make a big difference. It can turn a crispy, delicate dish into a culinary success.
Temperature Matters
Phyllo dough is very sensitive to temperature and moisture. Keep your workspace cool and dry. This prevents the sheets from becoming sticky or brittle. Aim for a room temperature of 68-72°F (20-22°C).
- Chill work surfaces before handling phyllo
- Use a marble or granite countertop if possible
- Keep a damp towel nearby to cover unused sheets
Surface Setup Requirements
Prepare a clean, smooth surface for your phyllo work. A large cutting board or clean kitchen counter is best. Make sure you have enough space for your ingredients.
| Workspace Essentials | Recommended Tools |
|---|---|
| Work Surface | Large, clean cutting board |
| Covering | Damp kitchen towel |
| Brushing | Soft pastry brush |
Time Management Tips
Speed and precision are important when working with phyllo dough. Have all your ingredients measured and ready before unwrapping the sheets. For a successful halibut and spinach wrapped in filo recipe, work quickly but carefully.
- Prepare all ingredients in advance
- Keep phyllo covered when not in use
- Work with one sheet at a time
- Move swiftly but gently
“The secret to perfect phyllo is preparation and patience.” – Professional Chef
Remember, practice makes perfect when handling these delicate pastry sheets. Each time you work with phyllo, you’ll become more confident and skilled. You’ll be able to create delicious dishes like your halibut and spinach wrapped in filo recipe.
Layering Techniques for Perfect Results
Knowing how many layers of phyllo dough to use is key to making tasty pastries. Layering phyllo dough is an art that needs precision and care.
Experts say the number of layers varies with the recipe. Usually, 3-6 layers are best for most dishes. The goal is to be consistent and use the right technique.
- For light, crispy appetizers: 3-4 layers
- For sturdy main dishes: 5-6 layers
- For delicate desserts: 4-5 layers
When figuring out how many layers to use, think about a few things:
- What texture do you want (crispy or substantial)?
- How heavy is the filling?
- How will you cook it?
| Dish Type | Recommended Layers | Texture Goal |
|---|---|---|
| Appetizers | 3-4 | Light and Crispy |
| Main Courses | 5-6 | Sturdy and Substantial |
| Desserts | 4-5 | Delicate and Flaky |
“The secret to perfect phyllo is not just layers, but the technique between them.” – Mediterranean Pastry Chef
Always brush melted butter or olive oil between layers. This makes the phyllo golden and flaky. It will wow your guests and boost your cooking skills.
Common Mistakes to Avoid When Using Phyllo
Working with phyllo dough can be tricky. It’s important to know the common mistakes to avoid. This way, you can make perfect pastries every time.
Phyllo dough is very delicate. It requires careful attention to detail. Let’s look at the most common errors that can ruin your dishes.
Storage Mishaps to Dodge
- Never refreeze thawed phyllo dough
- Keep unopened packages sealed in the refrigerator
- Use within 2-3 months of freezer storage
- Thaw overnight in the refrigerator
Handling Challenges
Phyllo sheets are very fragile. They can tear or crumble easily. Always handle them gently and work quickly to prevent drying.
Brushing Technique Troubles
| Mistake | Correct Approach |
|---|---|
| Heavy-handed brushing | Gentle, light strokes with butter or oil |
| Uneven oil application | Use consistent, thin layers between sheets |
| Cold butter/oil | Slightly warm for easier spreading |
Pro tip: Keep phyllo covered with a damp towel while working to prevent drying out.
“Patience and gentle handling are the secrets to perfect phyllo,” says professional pastry chef Maria Rodriguez.
Storage and Preservation Methods
Keeping your phyllo dough right ensures it stays good and lasts longer. You might be curious about how to store it in the fridge or freezer. The right way to store it is key to keeping its soft texture.
- Wrap the dough tightly in plastic wrap
- Place in an airtight container
- Refrigerate for up to 2 months
- Keep away from direct light and heat
Freezing is a great way to store it for a long time. Properly packaged phyllo can stay frozen for months without losing its softness. Here’s how to freeze it:
- Wrap sheets in plastic wrap
- Place in a freezer-safe bag
- Remove excess air to prevent freezer burn
- Label with the date of storage
“Careful storage is the secret to maintaining phyllo’s perfect texture and flavor.” – Professional Baker’s Tip
By the way, do you soak halibut before cooking? This might seem off-topic, but yes, soaking halibut in milk or saltwater can get rid of any fishy taste and make it taste better.
| Storage Method | Duration | Best Practices |
|---|---|---|
| Refrigeration | Up to 2 months | Tightly wrapped, airtight container |
| Freezing | 3-4 months | Wrapped in plastic, freezer bag |
Proper care keeps your phyllo dough fresh and ready for your next dish.
Conclusion
Learning how to keep phyllo shells crispy is key to making great pastry dishes. It takes careful technique and attention to detail. By using the tips from this article, you can improve your baking and make phyllo dishes that taste like they’re from a restaurant.
The secret to avoiding soggy phyllo shells is in how you prepare and score them. Scoring the top layers before baking makes them crisp and easier to serve. Choosing between butter and olive oil can also change how your pastry turns out, each adding its own special touch.
Whether you’re using thin #4 filo sheets or thicker #10 ones, the basics stay the same. With practice and patience, you’ll get better at working with phyllo dough. Remember, the right preparation is everything – from keeping your workspace cool to brushing each layer with the right fat.
Your journey with phyllo dough is just starting. Keep trying new things, experiment with different fillings, and most importantly, have fun making delicious pastries. With these tips, you’re ready to turn simple ingredients into amazing dishes that will wow everyone.
FAQ
Q: What is the difference between filo and phyllo dough?
A: Filo and phyllo dough are the same thing. They are thin, delicate pastry sheets. Both are used in sweet and savory dishes.
Q: How many layers of phyllo dough should I use?
A: The number of layers depends on your recipe. For most dishes, 3-6 layers work well. Desserts like baklava need 10-12 layers for extra flakiness.
Q: Do you have to butter each layer of phyllo?
A: You don’t have to butter every layer, but it’s recommended. Brushing each layer with melted butter or oil makes them crispy. At least brush every other layer for the best result.
Q: How do you keep phyllo shells from getting soggy?
A: To avoid soggy shells, follow these tips: 1) Brush layers with melted butter or oil, 2) Bake at 375-400°F, 3) Use a wire rack, and 4) Serve soon after making.
Q: Should you soak halibut before cooking?
A: Halibut doesn’t need soaking. Pat it dry with paper towels before cooking. A brief milk soak can remove strong fishy tastes.
Q: Can I make phyllo dough at home?
A: Making phyllo dough at home is very hard. It needs a lot of skill to roll out thin sheets. Most people buy it from stores for easier results.
Q: What’s the best way to store unused phyllo dough?
A: Store unopened phyllo dough in the fridge or freezer. Wrap opened sheets in plastic wrap and bag them. Use within a few days or freeze for up to three months. Thaw slowly in the fridge to avoid moisture damage.